Sunday, June 30, 2013

First brew of 2013 - Black IPA

So, it's been a pretty long time since I brewed.  In fact, I'm embarrassed to say, the last beer I brewed was over a year ago! (yes, I made a mead last fall, but that doesn't really count...).  I've been excited to finally get back to it!  My parent's bought me a recipie kit from Austin Homebrew for Christmas - a Black IPA.  It's an all grain kit, and the grain is un-crushed; good because it keeps better this way, but I didn't have a grain mill so I haven't gotten around to brewing it until now.  I finally bit the bullet and bought a Barley Crusher grain mill with a 7 lb hopper.


Brew day went pretty well, considering how long it's been since I've brewed!

The new Barley Crusher mill worked like a charm!


I had to improvise a new fermentation chamber as the last one I built was insufficient to deal with the Houston summer heat.  So for now, I hooked up my temperature controller to an old minifridge.  The minifridge's internal thermostat doesn't work anymore (it just runs at full all the time until everything freezes), so I figured since I was going to bypass that anyway and use my temperature controller, it would work perfectly as a fermentation chamber!  I removed the door lining, and the fermentor just barely fits.  Looks like my next project will be to build a bigger fermentation chamber around this fridge.

Black IPA

Estimated OG: 1.078 SG
Estimated Color: 24.6 SRM
Estimated IBU: 171.9 IBUs
Brewhouse Efficiency: 70.00 %
Est Mash Efficiency: 76.7 %
Boil Time: 60 Minutes

Ingredients:
------------
Amt                   Name                                     
14 lbs 12.0 oz        Pale Malt (2 Row) US (2.0 SRM)          
8.0 oz                Black (Patent) Malt (500.0 SRM)          
8.0 oz                Brown Malt (65.0 SRM)                    
8.0 oz                Caramel/Crystal Malt - 60L (60.0 SRM)    
1.04 oz               Millenium [15.20 %] - Boil 60.0 min      
1.04 oz               Warrior [15.23 %] - Boil 60.0 min       
1.04 oz               Zythos [10.90 %] - Boil 60.0 min         
1.04 oz               Zythos [10.38 %] - Boil 30.0 min         
1.04 oz               Falconer's Flight [10.85 %] - Boil 15.0  
2.0 pkg               California Ale (White Labs #WLP001) 
1.00 oz               Falconer's Flight [11.40 %] - Dry Hop 
1.00 oz               Zythos [10.90 %] - Dry Hop 


Mash Schedule: Single Infusion, Light Body, Batch Sparge
Total Grain Weight: 16 lbs 4.0 oz
----------------------------
Name              Description                             Step Temperat Step Time     
Mash In           Add 5.58 gal of water at 160.3 F        150.0 F       60 min        

Sparge: Batch sparge with 2 steps (0.36gal, 3.99gal) of 168.0 F water

Friday, June 28, 2013

3rd Year Hops!

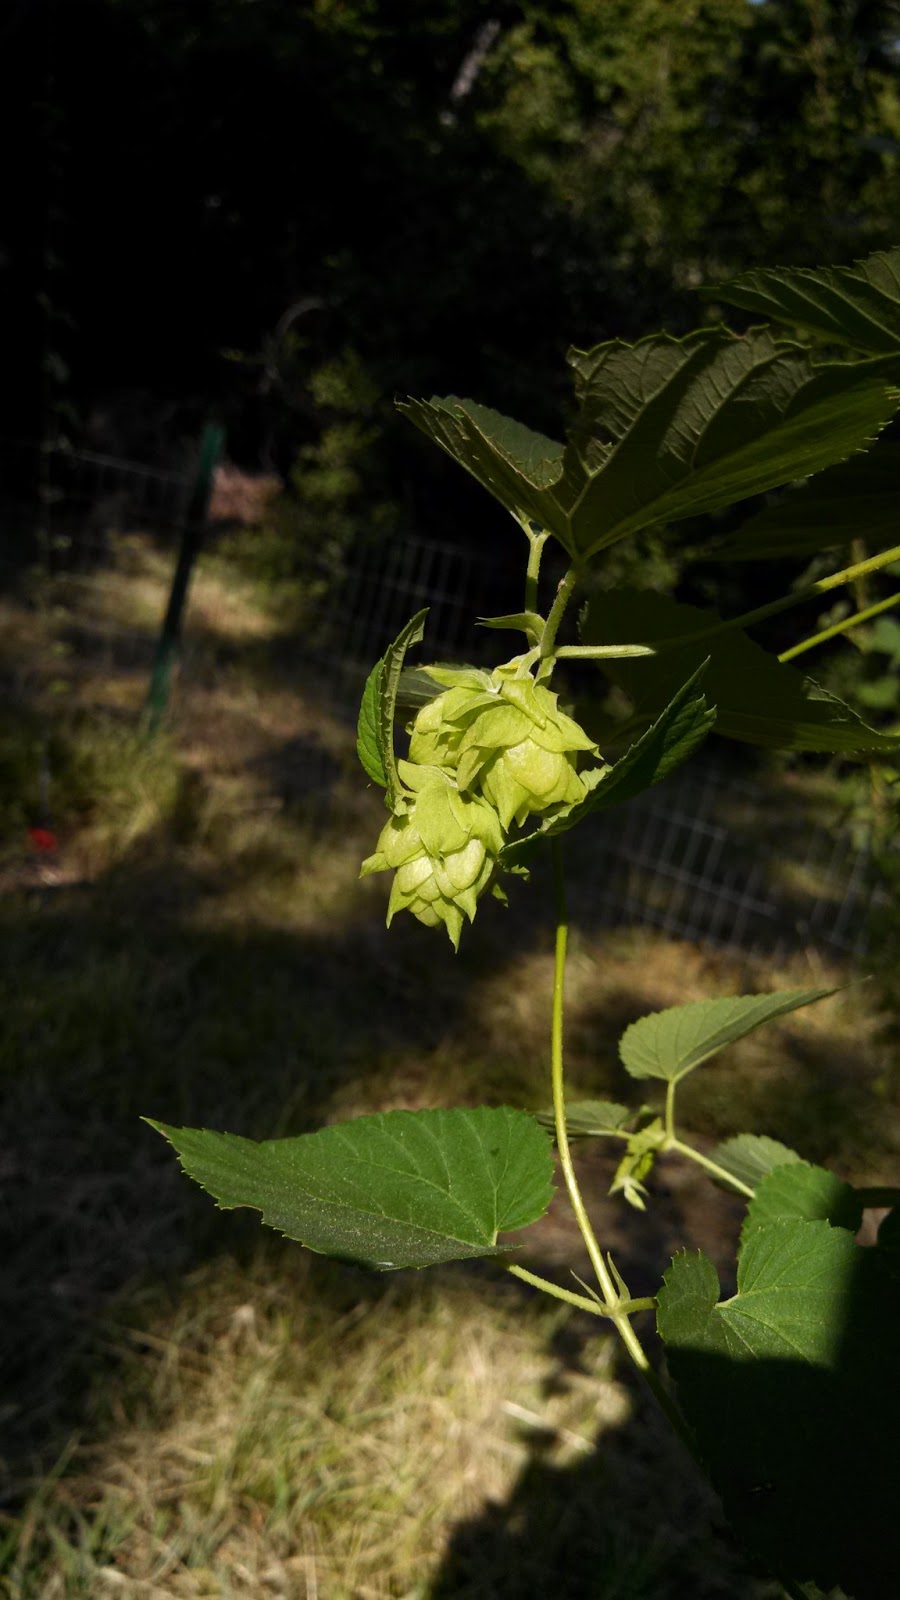
The hops have been doing pretty well!  Just thought I'd add some pictures of their growth.  I had to add a fence to keep the deer out (we have a heard of about 20 who migrate through our yard every day!).  One of the plants even has about a dozen cones on it already!


Friday, March 15, 2013

New Property - New Hop Trellis

My how the time flies!  Much has changed since my last post.  We moved further into the country so that we could have some more land and have room for a big garden, chickens, etc.  Our new home is a beautiful log cabin on 1.6 wooded acres!  But the real selling point for me was the barn - a 2,000 square foot metal building!  I have big plans for the barn: workshop, climbing wall, storage, but best of all - an upgraded brewery!

I decided to build a new hop trellis on our new property.  Fortunately, I found a dead tree trunk in the woods that was perfect - probably about 12 feet tall and fairly straight.  I screwed 3 eye bolts in at the top of the trunk.
Then I attached a steel guy wire, and a length of twine to each eye bolt.
I dug a 3 foot hole, and put a piece of brick at the bottom to make a stable bottom.  After placing the trunk in the hole, I filled around it with crushed stone so it will drain, and hopefully the trunk will be less likely to rot.  I evenly spaced the 6 lines around the base of the trunk, and dug a hole at each line for a hop hill.
My daughter helped me with the digging... :-)  I dug up the root ball from our old property and cut off some rhizomes about 4 or 5 inches long.  After planting a rhizome in each hole, I filled the hole with steer manure compost, and covered the mound with mulch.  Finally, I ran some drip irrigation lines from the garden to each mound.
Looking forward to seeing how they grow in the new location!  I don't expect a large harvest this year, since I am starting from small rhizomes again - they will mostly be establishing their roots this year.  Still, it would be nice to get enough to make a fresh hop IPA!


Saturday, September 29, 2012

My First Mead

A friend of mine has discovered that he has a gluten sensitivity, and wanted me to try making a mead.  I decided to go with this recipe.  Compared to making beer, this looks like it should be pretty easy!

Ingredients:

  • 15 lbs of honey (I used a local wildflower honey available at my local homebrew store)
  • 5 tsp acid blend
  • 5 tsp yeast nutrient
  • 1 packet of champagne yeast
I made a starter the day before.  On brew day, I mixed the 15 lbs of honey with water into the boil kettle for a total of 5 gallons.  Mix it up and slowly bring the temperature up to 170 deg F.  Hold the temperature for 20 minutes. (there is some disagreement here between those who make mead - some say the heating is unnecessary due to the antibiotic properties of the honey, and claim the temperature affects the taste.  Others say the heating is necessary to pasteurize it.  Since this is my first mead, I just decided to play it safe and go ahead and heat it).  Chill the mixture to 70 deg F.  Then add 5 tsp of acid blend and 5 tsp of yeast nutrient.  Finally, pitch the yeast.  After 3 months, you are supposed to transfer to a secondary carboy to finish fermenting.  Looking forward to seeing how this one comes out!  Could be a long wait, though - honey is a slow fermenter, and apparently can take 6 mos to a year to fully ferment!


1/13 update: racked to secondary carboy.  Checked gravity: 1.104 SG.

6/18 update: Checked gravity: 1.074 SG.  This is clearly taking longer than anticipated.  I think I will pitch some new yeast.

6/27 update: pitched packet of LALVIN EC-1118 yeast and 1 tsp of yeast nutrient.

Sunday, June 17, 2012

Taddy Porter Clone

Well, today is both Father's Day and my birthday.  My wife surprised me this morning with the sweetest pictures and cards from my daughters.  She also suggested that I have a brew-day this weekend, so I decided to make a Taddy Porter clone which I've been thinking about doing for some time.  I've been reading some old brewing texts lately, and reading up on the history of Porter.  Very interesting beer (and one of my favorites!).  It seems that historically porter was made primarily with brown malt.  Most modern porters, however, use pale malt as the base, and varying amounts of roasted malts (black, chocolate, patent, etc.) to get the color and flavor.  Some recipes I saw also used treacle or blackstrap molasses.  These sound intriguing, but I settled on the following recipe without molasses:

Recipe: Taddy Porter Clone
Style: Brown Porter
TYPE: All Grain

Recipe Specifications --------------------------
Boil Size: 7.74 gal
Post Boil Volume: 6.24 gal
Batch Size (fermenter): 5.50 gal
Bottling Volume: 5.10 gal
Estimated OG: 1.052 SG
Estimated Color: 23.1 SRM
Estimated IBU: 27.0 IBUs
Brewhouse Efficiency: 70.00 %
Est Mash Efficiency: 76.4 %
Boil Time: 60 Minutes

Ingredients: ------------
Amt Name Type # %/IBU
8 lbs 8.9 oz Pale Malt, Maris Otter (3.0 SRM) Grain 3 77.9 %
14.8 oz Brown Malt (65.0 SRM) Grain 4 8.4 %
14.8 oz Caramel/Crystal Malt - 40L (40.0 SRM) Grain 5
8.4 % 9.2 oz Chocolate Malt (350.0 SRM) Grain 6 5.3 %
1.63 oz Fuggles [4.20 %] - Boil 60.0 min Hop 7 23.6 IBUs
0.65 oz Fuggles [4.20 %] - Boil 10.0 min Hop 8 3.4 IBUs
0.9 pkg London Ale Yeast (Wyeast Labs #1028) [12 Yeast 9 -
Mash Schedule: Single Infusion, Medium Body, Batch Sparge
Total Grain Weight: 10 lbs 15.7 oz
 ----------------------------
Name Description Step Temperature Step Time
 Mash In Add 15.73 qt of water at 166.1 F 152.0 F 60 min
Sparge: Batch sparge with 2 steps (1.51gal, 4.12gal) of 168.0 F water

Saturday, April 28, 2012

Second Year Hops (Cascade)

We moved the hops to the back yard this year.  We lost a couple trees in the back yard due to last year's drought, which is unfortunate, but also provided an opportunity because now I think there is enough light in the back yard for the hops to grow!  I moved our raised garden bed close to the house, and ran some twine up the the eve of the second-story roof.  That should give the vines plenty of room to grow.  The biggest problem this year seems to be caterpillars.  Specifically, hop merchants!  I have to check them pretty much daily to pick them off.  They can eat some leaves pretty quick...
The hops are sharing the garden bed with arugula (bottom) and peas (right).


Wednesday, March 28, 2012

Stir Plate Build

OK, so I've been doing all-grain for a while now, and have been looking for new ways to improve the quality of my brews.  The things I've identified are: making starters, better oxygenation of wort, better temperature control (the peltier thermoelectric fermentation chamber turned out to be a bit under-powered, but we'll save that for another post).  I think making starters will have the greatest impact on my beer quality, and it may also save me money since, at the same time, I think I may start "washing" and re-using yeast, which is by far the most expensive ingredient.  I've done small starters before, using a mason jar covered w/ foil that I just shake periodically, but I'm looking to do a little better, so I built a stir-plate.  Parts list as follows:
(1) computer fan
(1) potentiometer
(1) DC spst lighted switch
(1) dial knob
(1) cigar box
(1) DC adapter
(4) bolts w/ nuts
(4) nylon washers
(2) neodymium (rare-earth) magnets
hot glue
(1) teflon magnetic stir bar
I bought all of the electrical components, switches, knobs, etc at radioshack.  I picked up the wooden cigar box for free from my local liquor store.  And, I found an old DC adapter in my box of wiring junk.  I bought the magnets at Ace Hardware, and I bought the stir bar at Austin Homebrew Supply.

I drilled four holes in the top of the cigar box for mounting the fan, and holes in the front for the switch and speed knob.

 The fan is mounted on the under-side of the box lid.  The two rare-earth magnets are hot-glued to the spinning hub of the fan.  Notice I ended up using a different fan than what I started with.  The first one spun too quickly, and kept throwing the stir-bar.
 Success!
 My first yeast starter on the stir-plate!

Saturday, October 1, 2011

First brew of fall

Ahhh... fall at last! This has been a particularly brutal summer here in Houston. A month of temperatures in the 100's, and little to no rain to speak of for most of the year. A "cool" front moved through on Friday night - I never thought mid-to-upper 80's would feel so good! Especially nice was that it went into the 50's last night. So we opened all the windows in the house. Nothing like waking up on a crisp fall day. Almost enough to make me forget I still live in Houston...

So, I thought I'd take advantage of the weather and have a brew day. My wife and I were thinking that a nice idea for Christmas presents this year might be a mix-pack of homebrews I've been working on. So far, we've got the Wicked Widow Pumpkin Porter, a Chocolate Coffee Breakfast Stout, an Oatmeal Stout, and possibly the Lagunitas IPA (if there's any left!). So, I was thinking it might be nice to round out with a pale ale, and/or another IPA. I'd really like another crack at my favorite IPA recipie, the DFH 60min IPA clone. As luck would have it, Simcoe is back in stock at my LHBS! Unfortunately, they didn't have any Nottingham yeast, so Ray sold me some Safale US-05 (American Ale) dry yeast, which he said was probably the closest thing. I've been trying to do starters now for all my beers, but the conventional wisdom on these dry yeasts are that you don't need to make a starter for them, unless it's a pretty high starting gravity (like 1.060 or 1.070). The DFH 60min IPA has a starting gravity of 1.072, which means I probably should do some sort of starter. So, I had an idea - why not make a smaller beer (something with an OG in the 1.040 - 1.050 range) and then pitch the IPA on top of that yeast cake when the small beer is done? That will save me the cost of a second pack of yeast, plus I've always wanted to try re-using yeast. Now I just have to decide whether I want to simply pitch the 2nd beer right onto the yeast cake, or "wash" the yeast, which is a process of separating the yeast from the trub and "canning" it for later use. I've got a couple weeks to think about it...

So, that brings us to today. I've settled on an IPA recipe I found on Homebrewtalk that uses US-05 yeast. The whole hop bill is Cascade, so that should be fun - I'll get a really good idea of what the Cascade flavor profile is like. Right now, I'm sitting in my open garage. It's about 80 degrees (wouldn't even need to have my fan blowing on me if it weren't for the mosquitoes...). I've got a glass of Rogue Dead Guy in my hand, and my grains are mashing with about 12 minutes left on the timer. Life is good...

Yooper's Pale Ale
All Grain
Batch size: 5 gal
Estimated O.G.: 1.058
Estimated color: 12 SRM
Estimated IBU: 43.6
Efficiency: 65%


Ingredients:
5 lbs 13.9oz Pale Malt, Marris Otter (3.0 SRM)
3 lbs 8.5oz Vienna Malt (3.5 SRM)
1 lb 14.1oz Munich Malt (20 SRM)
7.5oz Caramel/Crystal Malt (60 SRM)
7.5oz Caramel/Crystal Malt (20 SRM)
0.85 oz Cascade Hops (60 min)
0.64 oz Cascade Hops (30 min)
0.85 oz Cascade Hops (10 min)
0.43 oz Cascade Hops (5 min)
0.5 oz Cascade Hops (0 min)
1.0 oz Cascade Hops (dry hop 7 days)
0.5 tsp Irish Moss (15 min)
Safale US-05 American Ale Yeast

Monday, September 5, 2011

Breakfast Stout clone

Recipe: Breakfast Stout clone
TYPE: All Grain

Recipe Specifications
Batch Size (fermenter): 5.00 gal
Boil Size: 7.22 gal
Bottling Volume: 4.60 gal
Estimated OG: 1.079 SG
Estimated Color: 59.0 SRM
Estimated IBU: 60.0 IBUs
Brewhouse Efficiency: 65.00 %
Boil Time: 60 Minutes

Ingredients:
Amt Name Type %/IBU
13 lbs 3.2 oz Pale Malt (2 Row) US (2.0 SRM) Grain 76.2 %
1 lbs 6.1 oz Oats, Flaked (1.0 SRM) Grain 8.0 %
1 lbs Chocolate Malt (350.0 SRM) Grain 5.8 %
12.0 oz Roasted Barley (450.0 SRM) Grain 4.3 %
9.0 oz Black (Patent) Malt (530.0 SRM) Grain 3.2 %
7.0 oz Caramel/Crystal Malt -120L (120.0 SRM) Grain 2.5 %
1.26 oz Nugget [13.50 %] - Boil 60.0 min Hop 53.3 IBUs
0.57 oz Willamette [4.80 %] - Boil 30.0 min Hop 6.7 IBUs
0.50 oz Willamette [4.80 %] - Boil 0.0 min Hop 0.0 IBUs
0.50 tsp Yeast Nutrient (Boil 15.0 mins) Other -
0.50 tsp Irish Moss (Boil 15.0 mins) Fining -
1.0 pkg American Ale (Wyeast Labs #1056) [124.21 Yeast -
4.00 oz ground Sumatran coffee (Secondary 0.0 mi Flavor -
2.50 oz dark, bittersweet baker's chocolate (Boi Flavor -
1.50 oz unsweetened chocolate baking nibs (Boil Flavor -

Mash Schedule: Single Infusion, Full Body, No Mash Out
Total Grain Weight: 17 lbs 5.3 oz
---------------------------
Name Description Step Temperat Step Time
Mash In Add 23.66 qt of water at 166.1 F 155.0 F 45 min

Sunday, August 7, 2011

Wicked Widow Pumpkin Porter

Before moving to Houston 3 years ago, my wife and I lived in Tempe, Arizona, while we were in grad school at ASU. For a few years, we had the privilege of living within walking distance of 4Peaks Brewery, and I must say, we spent quite a bit of time there. I've never been much for "flavored" beers, but 4 Peaks made a seasonal pumpkin beer that was A-mazing. I heard through the inter-webs that the recipie on the Brewer's Connection site was pretty close, so I decided to start with that. I wanted to do it all-grain, so first I converted the extract to 2-row pale malt. Then, since I'm doing it all-grain, I decided to mash the pumpkin instead of adding it to the boil. Actually, I first baked the pumpkin in a 9x9 baking dish at 350 deg for 1 hour to caramelize it a little, then mixed it in with the grain bill. Finally, I added some rice hulls to the mash to avoid a stuck sparge with all that sticky pumpkin. The final recipe I came up with is below. The name "Wicked Widow" was a friend's suggestion; When I racked the beer from the fermenter into the bottling bucket, I found a small dead spider at the bottom of the fermenter (I brew outside, so I guess I shouldn't be too surprised...)!

Recipe: Wicked Widow Pumpkin Porter
TYPE: All Grain


Recipe Specifications
Batch Size (fermenter): 5.00 gal
Estimated OG: 1.050 SG
Estimated Color: 30.0 SRM
Estimated IBU: 22.6 IBUs
Brewhouse Efficiency: 61.00 %
Boil Time: 60 Minutes


Ingredients:
Amt Name Type %/IBU
8.8 oz Chocolate Malt (350.0 SRM) Grain 4.4 %
10.4 oz Munich Malt - 10L (10.0 SRM) Grain 5.2 %
8.8 oz Special Roast (50.0 SRM) Grain 4.4 %
6.7 oz Caramel/Crystal Malt - 90L (90.0 SRM) Grain 3.4 %
4.5 oz Carafa II (412.0 SRM) Grain 2.2 %
1.00 oz Goldings, East Kent [5.00 %] - Boil 60.0 Hop 19.2 IBUs
1.00 oz Fuggles [4.50 %] - Boil 5.0 min Hop 3.4 IBUs
0.17 oz Burton Water Salts (Mash 60.0 mins) Water Agent -
0.25 tsp Ground Clove (Boil 5.0 mins) Spice -
0.25 tsp Ground Ginger (Boil 5.0 mins) Spice -
0.75 tsp Cinnamon (Boil 5.0 mins) Spice -
1.00 tsp Irish Moss (Boil 10.0 mins) Fining -
22.00 oz Libby's Pumpkin (Boil 5.0 mins) Flavor -
1.0 pkg London Ale (Wyeast Labs #1028) [125.00 m Yeast -
8 lbs 1.3 oz Pale Malt (2 Row) US (2.0 SRM) Grain 64.5 %
1 lbs Pale Malt (6 Row) US (2.0 SRM) Grain 8.0 %
1 lbs Rice Hulls (0.0 SRM) Adjunct 8.0 %


Mash Schedule: Single Infusion, Medium Body, Batch Sparge
Total Grain Weight: 12 lbs 8.5 oz
----------------------------
Name Description Step Temperat Step Time
Mash In Add 17.71 qt of water at 164.6 F 154.0 F 60 min

Sunday, July 17, 2011

Lagunitas IPA clone

Recipe: Lagunitas IPA clone
TYPE: All Grain

Recipe Specifications
Batch Size (fermenter): 5.00 gal
Boil Size: 7.22 gal
Estimated OG: 1.057 SG
Estimated Color: 6.6 SRM
Estimated IBU: 46.2 IBUs
Brewhouse Efficiency: 65.00 %
Boil Time: 90 Minutes

Ingredients:
Amt Name Type %/IBU
11 lbs 5.3 oz Pale Malt (2 Row) US (2.0 SRM) Grain 92.6 %
6.4 oz Cara-Pils/Dextrine (2.0 SRM) Grain 3.3 %
4.8 oz Caramel/Crystal Malt - 60L (60.0 SRM) Grain 2.5 %
3.2 oz Munich Malt - 10L (10.0 SRM) Grain 1.6 %
0.91 oz Horizon [9.10 %] - Boil 60.0 min Hop 30.1 IBUs
0.75 oz Cascade [6.00 %] - Boil 30.0 min Hop 12.6 IBUs
2.63 oz Cascade [6.00 %] - Boil 0.0 min Hop 0.0 IBUs
1.00 tsp Irish Moss (Boil 10.0 mins) Fining -
1.0 pkg American Ale (Wyeast Labs #1056) [124.21 Yeast -
0.26 oz Tettnang [4.80 %] - Boil 30.0 min Hop 3.5 IBUs

Mash Schedule: Single Infusion, Medium Body, Batch Sparge
Total Grain Weight: 12 lbs 3.7 oz
----------------------------
Name Description Step Temperature Step Time
Mash In Add 17.29 qt of water at 168.6 F 154.0 F 60 min
Also made an awesome pizza from scratch tonight. Mmmm...

Monday, July 4, 2011

Oatmeal Stout

OK, just finished up building my first Mash Liquor Tun (MLT), so this will be my first all-grain batch. When making beer from grain, you need to mix water into the grain, and bring it up to a specific temperature which activates enzymes that convert the starches in the grains into the sugar that the yeast will eat. This is commonly done in one of two ways: (1) direct fire, in which the grain and water are put in a pot over a heat source (gas burner or something similar) to maintain the temperature, and (2) some sort of cooler into which the grain and hot water are added, and the lid closed to maintain the temperature. I went with the second option since it is generally cheaper. My first all grain is going to be an oatmeal stout.


Recipe: Yooper's Oatmeal Stout
TYPE: All Grain

Recipe Specifications
Batch Size (fermenter): 5.00 gal
Boil Size: 6.69 gal
Bottling Volume: 4.60 gal
Estimated OG: 1.057 SG
Estimated Color: 35.9 SRM
Estimated IBU: 39.0 IBUs
Brewhouse Efficiency: 72.00 %
Boil Time: 60 Minutes

Ingredients:
Amt Name Type %/IBU
7 lbs Pale Malt, Maris Otter (3.0 SRM) Grain 63.6 %
1 lbs Oats, Flaked (1.0 SRM) Grain 9.1 %
12.0 oz Victory Malt (25.0 SRM) Grain 6.8 %
10.1 oz Chocolate Malt (200.0 SRM) Grain 5.7 %
8.0 oz Barley, Flaked (1.7 SRM) Grain 4.5 %
8.0 oz Black Barley (Stout) (500.0 SRM) Grain 4.5 %
8.0 oz Caramel/Crystal Malt - 80L (80.0 SRM) Grain 4.5 %
2.1 oz Chocolate Malt (450.0 SRM) Grain 1.2 %
2.00 oz Willamette [5.50 %] - Boil 60.0 min Hop 39.0 IBUs
1.0 pkg British Ale II (Wyeast Labs #1335) [124. Yeast -

Mash Schedule: Single Infusion, Full Body, Batch Sparge
Total Grain Weight: 11 lbs 0.2 oz
----------------------------
Name Description Step Temperat Step Time
Mash In Add 22.45 qt of water at 167.4 F 156.0 F 45 min

Sunday, July 3, 2011

New Immersion Chiller

So, given the oppressive heat here, and the difficulty I've been having chilling my wort post-boil, I thought it might be time to build a new immersion chiller. Went to Home Depot and bought 50' of copper pipe. Carefully wrapped it around a plastic bucket. Then attached some vinyl tubing with some hose clamps and some hose adapters on the ends. I think it turned out pretty good!

Mash Tun Build

I built the MLT from a 10 gal Home Depot beverage cooler, a cooler bulkhead kit with a stainless steel ballvalve, and a stainless steel braided hose to filter the wort, from bargainfittings.com. I drilled some holes in the lid and filled it with great-stuff expanding foam to make it more insulative.

Cheap Mash Paddle

Getting ready to make my move to all-grain, and thought I'd better make a mash paddle. Fortunately, I found just the thing at Academy Sports; it's a wooden crawfish paddle. I cut a few holes in it with a hole saw and sanded it down nice and smooth. I'd eventually like to make something a little nicer, but this should get the job done just fine for now. While I was there, I also picked up a propane fryer stand so I can boil 5+ gallons of wort at one time!
 

Thursday, June 16, 2011

Worst. Brew. Day. Ever

Ok, so I just thought I'd share my experience from last night. I have 2 young daughters (3 yrs old and 11 mos old) so brewing during the daytime is generally difficult. I've had the ingredients for Yooper's DFH 60 min IPA clone and have been itching to brew it for a while now.

This weekend was my birthday and father's day, so I figured good a time as any. Got started as soon as the kids were asleep (8:30-ish). Made a few changes in this batch - LHBS was out of simcoe, so at their suggestion I substituted falconer's flight. Recently bought a 15 gal boil kettle, so I had to scale recipe from 2.5 gal to full volume boil. Also, fitted the hand-me-down immersion chiller w/ vinyl hose and lawn hose adapters. Since I live in TX and tap water is 80 deg or more, I also bought a big steel tub for an ice bath.

Boil went smoothly, then all hell broke loose. Hose popped off chiller, running hose water into wort. While putting ice in tub, my leg brushed the propane burner frame giving me a 2nd deg burn. Couldn't get down below 100 deg after all the ice melted, so I racked it to fermenter, holding the siphon hose w/ a couple ice packs in my hands. Got it down to 80 this way. Pitched yeast around 3am this morning. Discovered wort was scorched as it took half an hour to scrub black s#!t off bottom of new kettle. Put it in my newly constructed fermentation chamber, only to discover that the peltier I used was way undersized, so now it's been fermenting at over 89 deg for about 10 hrs. I think this may qualify as my worst brew day...

Wednesday, April 27, 2011

Peltier Thermoelectric Fermentation Chamber

OK, so this will be my first equipment build. Houston stays pretty warm during the summer months, so if I'm going to have any success brewing in the summer, I'm gonna need some way to keep my brew cool. I picked up a cheap mini-fridge on craigslist. The plan was to carefully remove the compressor and cooling lines, and install them in a larger, insulated box. But, when I got it home, I discovered that it is not your standard cooling system; this unit has what is called a peltier device. Basically, there is no compressor, and no coolant. There is just a metal plate which, when a current is applied to it, gets cold on one side of the plate, and hot on the other. The idea is to build an insulated box, and mount the peltier on the back wall of it, with some fans to move the cold air around. I'm sizing the chamber so that it could hold up to 3 carboys at one time, so that I could have one active brew, and a couple aging.
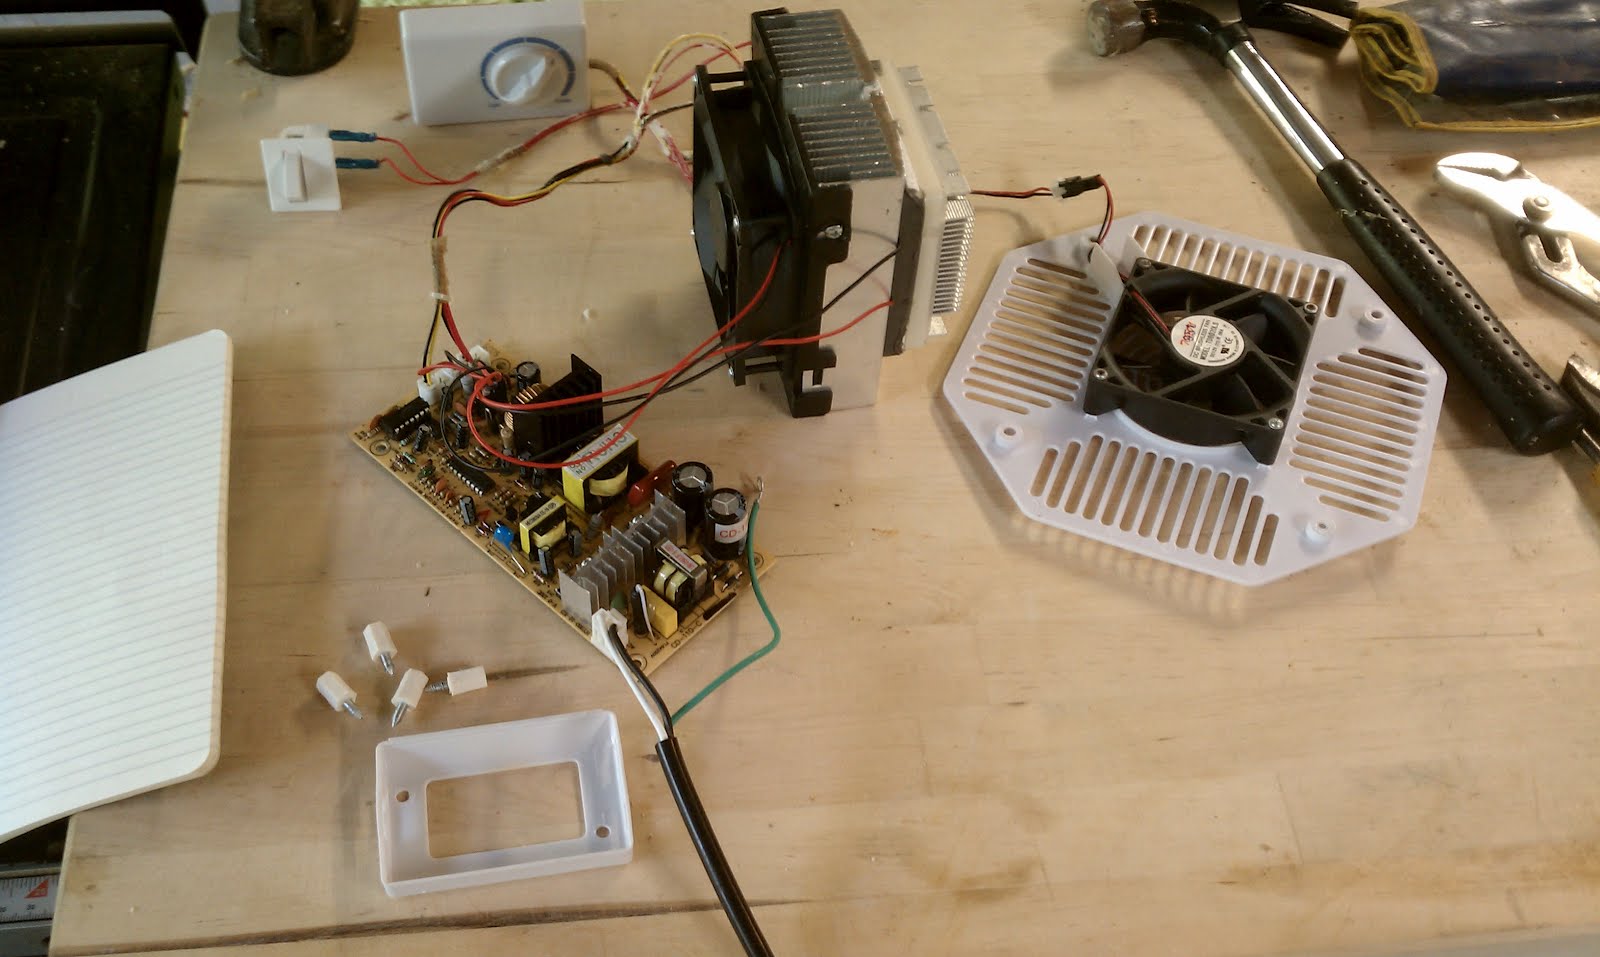
In this picture, you can see the main components removed from the fridge. The peltier is the part in the middle that looks like a big heat-sink with a computer fan attached. below that is a circuit board to control it. Top left are the temperature control knob and door light switch, and on the right is a circulation fan for the inside.


OK, now that the goods are removed from the fridge, it's time to build the new box. I built the frame out of 2x2s and 1x2s.
This is a shot from the front - the small boxed-in area in the back is where the peltier will go, as you can see in the next picture.

I had to rig up some sort of drain to deal with condensation, since water dripping down the inside would eventually ruin the particleboard interior. So, I cut a piece of pvc pipe in half to catch the condensation, and ran a small vinyl drain line through a hole in the pvc to a drain pan on the back of the chamber.


The circulation fan attaches in front of the cold-side of the peltier to keep air moving over it, and cooling the air inside the fermentation chamber. The temperature control knob will be attached to the back wall of the chamber, left of the fan. It doesn't need to be terribly accessible, since it will always be set to maximum cold, and the temperature will be controlled by an external controller.


Circulation fan mounted in front of peltier.  You can see the heavy-duty wires running from the external temperature control device to the back of the unit, where it will be wired to a standard outlet.
External temperature controller.


The external controller affords much greater precision and accuracy in controlling the temperature, and also allows me to use both heat and cooling, depending on the ambient temperature. Installing a heater, whether it's a brew-belt, or warming blanket, will be as simple as plugging it into the second outlet.

Top outlet for cold, bottom for hot.


Each wall of the box is insulated with 2 layers of 1" thick, aluminized rigid foam insulation board. I believe it was R5. The interior was then lined with plasticized masonite, in the hopes it would be somewhat moisture resistant. I caulked all of the joints, and put a gasket around the door opening.


The light switch is mounted just inside the door opening, and I attached a paddle to the door to depress the switch when the door is closed.


The temperature probe is at the end of a long wire, which I can tape to the side of a carboy to get an accurate read of the beer temperature.


I screwed the cover from the back of the mini-fridge onto the back to cover the circuit board and fan. Finally, I put some casters on the bottom, and a couple pull-latches to keep the door closed tight.


7/6/13 update: The peltier used to cool this chamber turned out to be a bit under-powered.  When I tried to use it in my garage in the summer, I had to put frozen bottles of water inside to help try to keep it cool.  I've decided I'm going to rebuild this using a conventional compressor and coil type unit.  For now, I've just attached my temperature controller to an old minifridge.  Will post more on this when I start my new build.